A Dublin photo walk beats wandering with no plan. PicTours Dublin turns a short stroll into smartphone photo practice and Instagram skills you can use right away, with stops at places you’ll recognize fast. I like that it mixes real landmarks—like Grafton Street—with practical shooting guidance, so you’re not just sightseeing and hoping for the best.
My favorite part is the teaching style: guides such as Anna and David are praised for making iPhone features and photo settings feel simple, even if you are not techy. One thing to consider: camera gear is not included, so you’ll want your own phone (and some willingness to walk at a beginner-friendly pace).
In This Review
- Key highlights worth your attention
- Why this Dublin photography tour works better than random sightseeing
- Meeting at Fusiliers’ Arch: how the 90 minutes flows
- Stop 1: St Stephen’s Green for wildlife-style framing (without the fuss)
- Stop 2: St Stephen’s Green Shopping Centre for indoor architecture photos
- Stop 3: Grafton Street street photography and the art of using busy light
- Stop 4: Anne Street South and the umbrella installation for contrast and color
- Stop 5: two secret Dublin photo stops the guide chooses for the day
- The Instagram training is practical, not performative
- Small-group coaching and iPhone tips you can actually apply
- “Professional-style” photos: what to expect you’ll leave with
- Price value: why a $0.00 Dublin photo walk is hard to beat
- Who should book this tour, and who might prefer something else
- Should you book PicTours Dublin? My take
- FAQ
- How long is the PicTours Dublin photography walking tour?
- Where does the tour start, and where does it end?
- What language is the tour offered in?
- Is the tour limited in group size?
- Do I need my own camera or phone?
- Is there a mobile ticket?
- Is free cancellation available?
- Are service animals allowed?
Key highlights worth your attention
- 90 minutes of guided photo technique at multiple Dublin landmarks and short secret stops
- Hands-on iPhone and smartphone tips, including framing and quick fixes for better shots
- Instagram-focused training, from filters to hashtags and posting timing
- Real-city backdrops like St Stephen’s Green, Grafton Street, and the umbrella installation area
- Small groups (up to 15), which makes it easier to get help and feedback
Why this Dublin photography tour works better than random sightseeing
If you’ve ever taken 30 photos of a place and still felt unsatisfied, this is the cure. The tour is built around a simple idea: you learn what to look for, then you practice immediately in the same spot. That timing matters. Light, crowds, and even the angle of a street change fast in Dublin, and you get guided prompts instead of staring at your screen and guessing.
The theme is photography with a Dublin lens. You start in a park with nature-and-wildlife framing ideas, move indoors for architecture, then hit high-energy street photography on Grafton Street. By the end, you are not just leaving with memories—you are leaving with a better way to see the city.
There’s also a social-media angle without feeling like a workshop from another planet. You learn Instagram basics such as filters, hashtags, and how posting time can affect who sees your posts. For most people, that translates to less stress when you get home and try to remember what you were even trying to capture.
You can also read our reviews of more tours and experiences in Dublin.


Meeting at Fusiliers’ Arch: how the 90 minutes flows
You meet near Fusiliers’ Arch by St Stephen’s Green, and the tour starts at 2:00 pm. It runs about 1 hour 30 minutes, with a maximum group size of 15 travelers, which keeps the energy friendly instead of chaotic.
You get a mobile ticket, and the tour is offered in English. You’ll visit 5–7 spots across the city, and the itinerary includes free admission at the listed stops. Each tour ends at a different point, so treat this as a walking loop rather than a strict out-and-back.
One practical note: the tour is focused on walking and shooting. If your idea of a vacation day is sitting down every 10 minutes, this may feel like a lot. If you like light movement and quick photo challenges, it’s a great fit.
Stop 1: St Stephen’s Green for wildlife-style framing (without the fuss)

St Stephen’s Green is where the tour teaches you to see before you press the shutter. The first stop is aimed at beginners, with a technique focused on capturing nature and wildlife-style shots in a park setting. Even if you are not photographing animals, the lesson applies to how you frame leaves, motion, and small details.
You get about 15 minutes here, which is enough time to try a beginner approach, then tweak it based on feedback. If you tend to shoot everything straight-on, this stop nudges you toward angles and attention to light. It’s also a nice warm-up because you’re starting with a calm, recognizable park rather than diving into a busy street immediately.
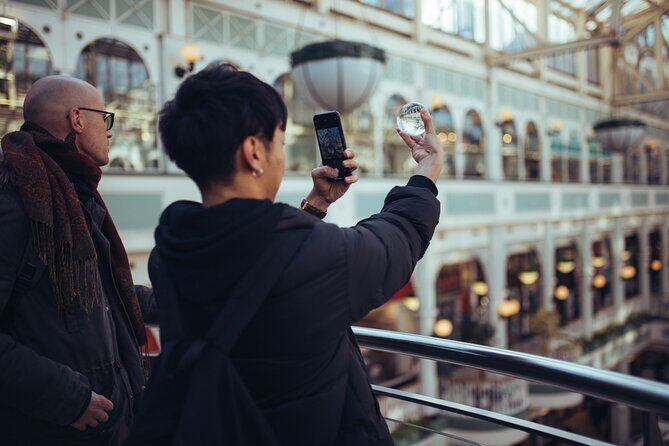
Stop 2: St Stephen’s Green Shopping Centre for indoor architecture photos
Next you head indoors to the St Stephen’s Green Shopping Centre. This part of the tour is gold if you’ve struggled with indoor photos that look flat or too dark. The focus is on the architecture of an older shopping space, with guidance on capturing interior design details.
It’s still only about 15 minutes, so expect quick technique prompts rather than long theory. The practical takeaway is how to handle indoor lighting: you’ll be taught how to get a clearer shot of shapes and textures, instead of letting your phone’s auto mode wash things out.
This stop also includes an early Instagram tip, so you’re not only learning to take better photos—you’re learning how to present them after the walk.
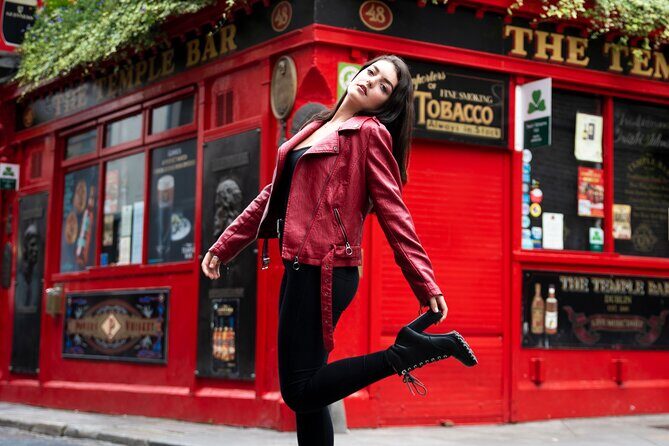
Stop 3: Grafton Street street photography and the art of using busy light

Then comes the Dublin you probably already pictured: Grafton Street. It’s described as the busiest and most famous street, and that energy is part of the point. Street photography is mostly about light, timing, and choice—what you include and what you leave out.
You get about 15 minutes here, focused on street photography technique and maximizing lighting for a stronger shot. You’ll also hear buskers night and day in the area, which means there’s often movement and color in the scene, not just static buildings. That’s excellent for practicing quick compositions.
On the Instagram side, you’ll learn about filtering and which hashtags can help the platform’s discovery system find your post. This is useful because it’s easy to take a great photo and then accidentally post something that never reaches the people who would actually enjoy it.


Stop 4: Anne Street South and the umbrella installation for contrast and color

At Anne Street South, the tour points you to a back-street scene with a famous umbrella art installation. You don’t just get a place to photograph—you get a focus: contrast and how to maximize color so your image pops instead of looking muddy.
This stop is also about using the available light instead of fighting it. That might sound obvious, but most smartphone photos fail because people treat lighting like a problem to ignore. The tour teaches you how to work with what you have, then frame your subject so the color and contrast do the heavy lifting.
There’s another Instagram coaching angle here too, including tips about the right posting time to reach friends and followers.
One more practical angle: back streets can be easier to photograph than main streets because you can find a calmer position faster. If crowds bother you, this is the kind of stop that lets you slow down and focus.
Stop 5: two secret Dublin photo stops the guide chooses for the day
The final segment is where the tour earns its name as more than a checklist. You get a 30-minute stop that includes two secret photo locations designed to show a lesser-spotted Dublin. The specific spots can change daily based on weather, new installations, and what fits your group’s interests.
This flexibility matters, because photography depends on conditions. If the sky is overcast, you often want different angles than you do in bright sun. If there’s a new public art moment, you’ll want to be in the right place at the right time. The tour adjusts so your camera work stays relevant to what Dublin is doing that day.
You’re encouraged to tell your guide if you have preferences—like types of scenes or photography topics you want to learn. That’s a smart way to get a tour that feels personalized without needing you to plan anything.
The Instagram training is practical, not performative
The tour’s Instagram tips are built into each major stop. You learn how to use filters, which can be a shortcut for improving mood and consistency. You also learn which hashtags help people discover your posts, which is especially helpful if you usually post without thinking about how it gets categorized.
Timing matters too. One of the stops includes guidance about posting time to catch attention. Even if you never become an Instagram power user, those tips can reduce the usual frustration of posting a great shot and seeing it disappear into the void.
If you are the kind of person who shares photos only after a long delay, this tour nudges you toward sharing smarter—so you get more satisfaction out of the photos you worked to take.
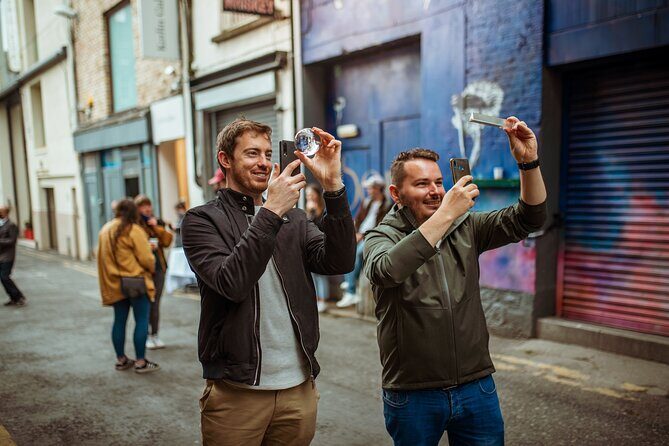
Small-group coaching and iPhone tips you can actually apply
The most praised aspect of this experience is how guides teach photography in a way that feels doable. Names that come up with strong praise include Anna, Diana, Shauna, Anu, Anupama, and David. Across those accounts, the common theme is patience and practical feedback—especially for people using iPhones.
Several guests describe the tour as a way to get comfortable with features they were not using before. That’s a big deal if you’ve had your phone for years and still rely on point-and-shoot mode. This kind of coaching helps you start thinking in terms of composition and light, not just pressing a button.
There’s also mention of 1:1 feedback when group size is small. So if you like more direct help, this format can work well, particularly for couples, solo travelers, or families where kids need an activity that stays fun and easy.
“Professional-style” photos: what to expect you’ll leave with
The highlights say you’ll bring home professional-style photos of your trip. In the practical version, you should expect two things:
- You learn techniques to improve the photos you take yourself
- You may also receive a collection of photos taken by the guide, with at least one guest noting they received them in a few days
That combo is a nice safety net. If you have a day where your phone battery dies, your memory card is full (unlikely, but you know), or you just miss the moment, you still have guide shots to help round out your story.
Price value: why a $0.00 Dublin photo walk is hard to beat
This tour is listed at $0.00 per person. If that price is accurate when you book, the value is hard to argue with. You get:
- 1.5 hours of guided shooting across major Dublin locations
- Instagram coaching, including hashtags and posting timing
- Small-group attention (max 15)
- Additional photos taken by the guide in some cases
Even if you compare it to paid photo workshops, the big advantage here is geography plus technique. You don’t just learn; you apply what you learn on the same streets. That is where most tours lose people: they’re either all talking or all walking without instruction. This one tries to do both, with a clear photo goal.
If you’re deciding based on price alone and it turns out the cost changes later, use a simple check: would you pay for a guided way to improve your smartphone photos and get better Dublin shots in 90 minutes? If yes, it still sounds like a strong pick.
Who should book this tour, and who might prefer something else
This experience is ideal if you want:
- A smartphone-friendly photography upgrade
- A quick, efficient way to get Instagram-ready shots around central Dublin
- A tour that includes stories and context, but stays focused on taking photos
It’s also a solid option for groups who want something different from standard sightseeing. One praised point is how it can work for families and kids because it’s active and easy to follow.
You might want to choose another option if you:
- Expect camera equipment to be provided (it is not included)
- Prefer slow-paced history tours with long sit-down explanations
- Hate walking or photo stops that ask you to try again and tweak angles
Should you book PicTours Dublin? My take
Book it if you want a better relationship with your phone camera and you’re excited to photograph Dublin in a guided way. The best sign is the repeated praise for how guides make iPhone features and photo techniques feel understandable, plus the mix of classic landmarks and bonus secret stops.
Skip it only if you’re looking for a passive tour or if you don’t want to practice at all. This one works because you’ll be doing small challenges at each stop, from park framing to street lighting and indoor architecture.
If you’re in Dublin for a short time, this is a smart first activity. You’ll leave with photos you feel proud of, and you’ll start seeing Dublin with more intention from that day forward.
FAQ
How long is the PicTours Dublin photography walking tour?
The tour runs about 1 hour 30 minutes.
Where does the tour start, and where does it end?
It starts at Fusiliers’ Arch St Stephen’s Green, Dublin, D02 HX65, Ireland. The tour ends at a different point each time.
What language is the tour offered in?
The tour is offered in English.
Is the tour limited in group size?
Yes. The maximum group size is 15 travelers.
Do I need my own camera or phone?
Camera equipment is not included. Bring whatever device you want to use for photos.
Is there a mobile ticket?
Yes, the tour includes a mobile ticket.
Is free cancellation available?
Free cancellation is available. You can cancel up to 24 hours in advance for a full refund.
Are service animals allowed?
Yes, service animals are allowed. The tour also notes that most travelers can participate.